
In this article:
Overview:
A job in DvSum automates data validation, transformation, and integration tasks by executing a specified number of Data Quality (DQ) rules and profile tables. Jobs can be scheduled or triggered via API, but not both simultaneously. This guide walks you through creating a new job, configuring its parameters, and scheduling it for execution.
Step-by-Step Guide
Step 1: Navigate to the Job Creation Page
- Log in to DvSum and navigate to the DQ Rules tab.
- Select any rule, click on More Actions, and then Add to Jobs.
Step 2: Choose a Job
- From the dropdown, select an already created job or click on Create a New Job.
- If creating a new job, a dialog box will appear. Click OK.
Step 3: Configure Job Parameters
- In the Definition tab, add a job description.
- Choose the selection type:
- Fixed
- Dynamic
Applying Filters When Using Dynamic Selection
When configuring the Selection Type, if you choose Dynamic, filters must be applied to define which rules or tables will be included in the job at runtime.
To apply filters:
Select the Dynamic option under Selection Type.
Under the Add Criteria section, click Add Condition Group to define one or more filter conditions.
Once the conditions are set, click Apply Filter.
After applying the filter:
The Selected Rules or Selected Tables section will automatically populate based on the applied criteria.
These selections are not editable — you cannot manually add or remove individual items.
Note: If no filter conditions are applied, no rules or tables will be included dynamically in the job.
Step 4: Configure Notification Settings
In the Notification tab, you can define how and when email notifications are sent, and specify who should receive them.
Email Notification Options
When you first open the Notification tab, you'll see two options:
- Send schedule completion email
- Send email on job delay
Once Send schedule completion email is selected, an additional option appears:
- Send email on alerts
All three options can be selected together. Here's what each one does:
| Notification Option | Purpose |
|---|---|
| Send schedule completion email | Notifies recipients when the job finishes its scheduled execution. |
| Send email on alerts | Sends notifications when alert conditions are triggered during a job. |
| Send email on job delay | Alerts recipients if the job exceeds its expected duration. |
Job Delay Alert Configuration
If Send email on job delay is selected, a configuration panel appears with the following settings:
-
Duration Threshold
- Automatically Determined Duration (default): Uses Interquartile Range (IQR) outlier detection on job run times to identify delays. Manual edits are allowed until four executions, after which thresholds auto-adjust.
- Set Custom Duration: Manually specify the maximum expected duration. An alert is triggered if the job exceeds this time.
- Input format:
HH:MM:SS
-
Alert Frequency
- Define how often reminder emails should be sent after a delay is detected.
- Input format:
HH:MM:SS
Email Recipients
You can specify both internal and external recipients:
-
Internal Recipients
- Select users or groups from the Available list.
- Move selections to the Selected list using the arrow buttons.
- At least one internal recipient is required.
-
External Recipients
- Enter comma-separated email addresses.
- Only emails from whitelisted domains are allowed.
- Example:
example@email.com, another@email.com
Step 5: Set Job Scheduling Options
- Navigate to the Schedule tab.
- Choose a schedule type:
- Scheduled (For scheduled execution)
- Execute via API (Refer to the Executing Job via API article)
Scheduling Information
One-Time Execution
- Choose a start date and time.
- Set an end date, if applicable.
Recurring Execution
Daily
- Choose the number of days between executions.
Weekly
- Select the number of weeks and the days for execution.
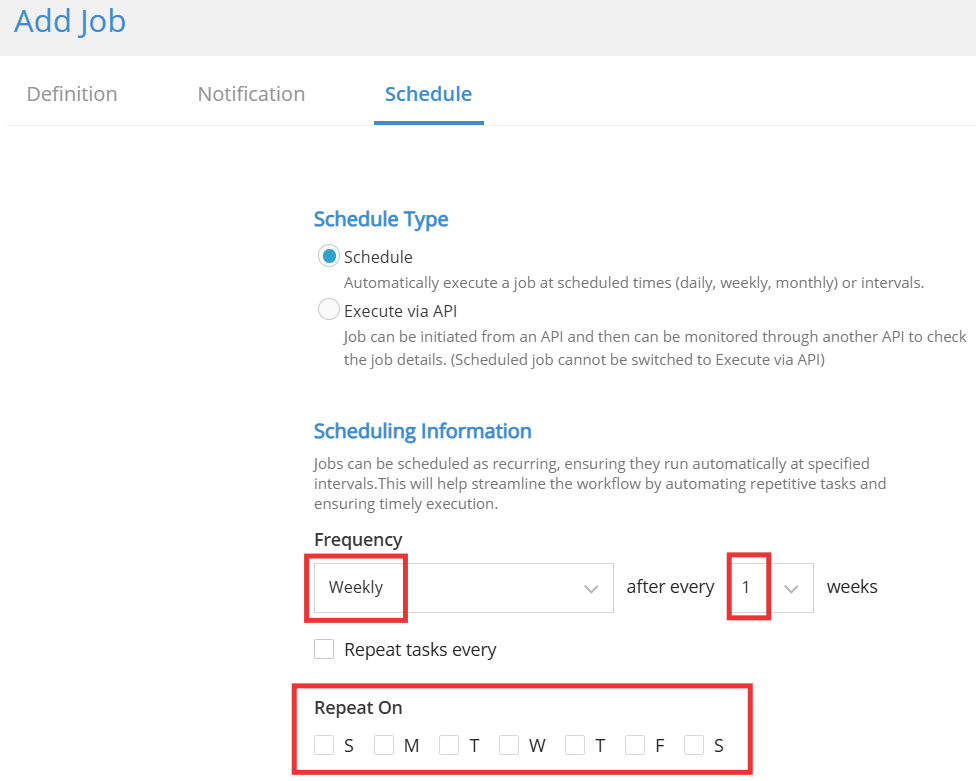
Monthly
- Choose the number of months.
- Select repeat on days of the month or week of the month.
Repeat tasks every Condition
The Repeat tasks every option is used to configure how frequently a task runs within a defined schedule.
Enter the repeat interval and select the time unit, such as Minutes or Hours. The task repeats based on the configured interval.
A start time and end time can be specified to define the period during which the task runs. For example, if the repeat interval is set to 30 minutes, with a start time of 09:00 AM and an end time of 06:00 PM, the task runs every 30 minutes between 09:00 AM and 06:00 PM.
Continuously
Configure continuous job execution with frequency and limits
The Frequency settings control how often a job runs, on which days, and within which time window.
Run mode: Continuous with delay
When Continuous is selected as the run mode, the job executes repeatedly with a fixed delay between each run.
The delay can be defined using:
- Minutes
- Hours
Example:
If Continuous is set with a 30-minute delay, the job starts and then runs again every 30 minutes as long as the schedule allows.
Limit execution by days
Execution can be restricted to specific days of the week.
- Days on which the job should run are selected (for example, Monday, Thursday, Friday, Saturday).
- If a day is not selected (for example, Tuesday, Wednesday), the job does not execute on that day, even if continuous execution is enabled.
Example behavior:
- Job is configured to run continuously every 30 minutes.
- Selected days: Monday, Thursday, Friday, Saturday.
- Result:
- On Monday, Thursday, Friday, and Saturday, the job runs every 30 minutes within the defined time window.
- On Tuesday and Wednesday, the job does not run.
Limit execution by time window
Execution can also be restricted to a specific time period each day.
- Start time – Earliest time at which the job can start running on selected days.
- End time – Latest time at which a new run is allowed to start on selected days.
The job will:
- Start at or after the start time on selected days.
- Continue running with the configured delay (for example, every 30 minutes).
- Stop starting new runs once the end time is reached.
- Any run already in progress may complete, but no new runs begin after the end time.
Schedule summary
A Schedule Summary is displayed at the bottom of the configuration page. This summary describes how the job will run based on the selected settings.
Example summary text:
Runs continuously from Monday, Thursday, Friday, Saturday between 10:40 and 11:35 each day, every 30 minutes.
Starts on 09/21/2026 at 10:34 PM.
End Conditions
- Never Ends: The job runs indefinitely.
- Ends After: Set the number of occurrences.
- Ends On: Set a specific end date.
Practical Examples of Job Frequencies
1. One-Time Execution
Example: A migration is scheduled for September 30, and validation needs to run once after the migration completes.
- Start date: 09/30/2026
- Start time: 10:00 AM
- End condition: Ends after 1 occurrence
Result:
The job runs once on September 30 at 10:00 AM and does not run again.
2. Hourly Frequency
Use case: A company receives customer data throughout the day and wants to run DQ rules to check the newly loaded data every hour.
For example, configure the job as:
- Frequency: Hourly
- Repeat every: 1 hour
- Starts on: 09/30/2026
- Start time: 10:00 AM
- Ends: Never
How it works:
The job will automatically run every hour starting at 10:00 AM:
10:00 AM → 11:00 AM → 12:00 PM → 1:00 PM → 2:00 PM → ...
This is useful when data is loaded throughout the day and data quality needs to be checked regularly rather than waiting for a daily job.
3. Daily Frequency
Example: A DQ job validates daily sales data after the overnight data load.
- Frequency: Daily
- Repeat every: 1 day
- Start time: 6:00 PM
Result:
The job runs every day at 6:00 PM.
Example schedule:
- September 28 – 6:00 PM
- September 29 – 6:00 PM
- September 30 – 6:00 PM
- October 1 – 6:00 PM
4. Weekly Frequency
Example: A customer-data validation job runs every Monday after the weekly data refresh.
- Frequency: Weekly
- Repeat every: 1 week
- Days: Monday
- Time: 7:00 AM
Result:
The job runs every Monday at 7:00 AM.
If every 2 weeks is selected, the job runs every other Monday.
5. Monthly Frequency
There are two useful monthly scenarios.
Example A – Specific day of the month
A financial validation job needs to run on the 1st day of every month.
- Frequency: Monthly
- Repeat every: 1 month on 30th
- Time: 8:00 AM
Result:
- October 30 – 8:00 AM
- November 30 – 8:00 AM
- December 30 – 8:00 AM
Example B – Week of the month
A monthly governance check needs to run on the first Monday of every month.
- Frequency: Monthly
- Repeat every: 1 month
- Repeat on: First Monday
- Time: 9:00 AM
Result:
The job runs on the first Monday of each month at 9:00 AM.
Additional Way to Add a Job: From the Job Detail Page
Apart from adding jobs via the DQ Dictionary tab, you can also add a job directly from the Job Detail page. This provides a convenient way to manage jobs and quickly add related jobs without navigating back to the dictionary.
How to add a job from the Job Detail page:
1-From administration Tab navigate to the Jobs drop down and select Definitions in the DI tool.
2- Click the Add Job button located at the top.
3- Follow the same steps to select rules, configure parameters, notifications, and scheduling as described earlier.
Cloning Jobs:
From the Job Detail page, you can also use the More Actions menu to quickly clone an existing job. This allows you to duplicate the job configuration and make adjustments without creating it from scratch.
Job can also be cloned from the Job Detail page by navigating to Edit > Clone Job.
Profile Tables
A Profile Table job is used to analyze the structure and quality of your data by generating profiling statistics on selected tables. Profiling helps you understand the characteristics of your data before applying rules or transformations.
Purpose of Profile Jobs
- Identify data distribution and patterns.
- Detect data quality issues such as missing values, duplicates, or anomalies.
- Gain insights into column-level statistics (null counts, distinct values, min/max, etc.).
How to Create a Profile Job
1. Job Category
Select Profile Tables as the job category. This specifies that the job will profile data instead of executing rules.
2. Follow the same steps to select tables, configure parameters, notifications, and scheduling as described earlier.
Scan Source
A Scan Source job is used to discover metadata from a data source, helping build a catalog of data assets. Optionally, the scan can include profiling and lineage for deeper insights.
Purpose of Scan Source Jobs
Discover and catalog datasets, tables, columns, and schemas
Generate metadata inventory for governance and data discovery
Optionally include profiling statistics and data lineage mapping
How to Create a Scan Source Job
Job Category
Select Scan Source as the job category. This indicates that the job will scan a data source for metadata.Data Source and Scan Catalog Options
Choose the appropriate Data Source from the dropdown.
Under Scan Catalog, you can optionally select:
Profile – to include profiling statistics in the scan
Lineage – to analyze data relationships and flow
If neither option is selected, the job will schedule a catalog-only scan, capturing only metadata like table names, columns, and schema details.
Follow the same steps to configure parameters, notifications, and scheduling as described earlier.
0 Comments